October 31, 2012

Pansy: Links and conclusions

Hi all!

It's the end of October so let us conclude.

It seems that as much as I love pansies they are very boring to sketch. I don't know, I just didn't feel challenged by these flowers. I do hope that when I do them in color, it will be more interesting.

In the meantime, these are the methods I found on the subject.
  1. Method 1 - taken from How To draw
  2. Method 2 - taken from DragoArt
  3. Method 3 - also taken from DragoArt
  4. Method 4 - taken from TLC.

This is an additional tutorial that I didn't use but it's possible you might find it interesting. Taken from How to draw cartoons.

October 12, 2012

How to draw a Pansy - method 2

This one is from Dragoart and it's super easy, no challenge at all!
Could pansy be such a simple flower to draw?

I have only three sketches this time, but I got so bored I decided to stop in the middle.

This was made by it's tut.

And these are by reference (1, 2)

What a pity.....

October 08, 2012

Sukkot greeting card

Hi all and happy holidays!!

It's Sukkot time now. It is the one before the last of the Jewish holidays for this season. There will be nothing until Hannukah in December. Which gives me plenty of time to work on a new card. But in the meantime let me walk you through the process of creating this Sukkot card I made recently.

When I started my research for Sukkot card I immediately thought of a Palm tree. This is actually the first thing that comes in my mind when I think of Sukkot: these huge palm tree branches that cover the top of every Sukkah. I really wanted to include them in my card so the very first thing I did was to create a background with palm tree branches. A second later I added a light blue background to imitate the bright sky.

Then I added a frame and some traditional Sukkot elements - the Four Species. After completing these images and after adding a greeting I looked at my card and realized that it looked boring and empty. So I started to play with decorative elements again - and if you remember, one of the things people do with their newly built Sukkah is to decorate it. So it was only appropriate.

I knew that since there major theme of the card was already complicated and filled with details I should have added some simple element here. So I added a light gradient triangle on the left. I knew I wouldn't want for it to look like some kind of a mirror or add reflections - it would only make a mess. But after a while I saw that one triangle was not working so I added another one on the right. For me it was like creating an open doors effect.

After a while I added some gradient sticks to the corner of the card and it was finally completed.
I was happy.

Have a great Sukkot everyone!!!
D.

October 06, 2012

Rosh haShana greeting card

Hi hi and happy holidays!

Rosh haShana is a Jewish new year. It is about new beginnings, wishings for a sweet and fruitful year and a great mood.

When creating this one I obviously wanted to use warm, honey - like colors with images of food that are always on a traditional Rosh haShana tables.

I started playing with the food images trying to combine four major elements: honey, apples, dates and pomegranate (I didn't really see how fish head would work here, although it would be appropriate).  After finishing the main theme I started playing with the background.

I must say that lately I have this thing with frames and for some reason I didn't want to do a symmetrical one here. And you know what? I think this asymmetry work nicely here! I did the frame and since it still looked empty to me I started playing with the elements. I must say that the dashed line came completely by accident, but I'm glad it did. It might look like an old fashioned card, but I like it.

I hope you do to.

Happy holidays!!!
D.

October 03, 2012

How to draw a Pansy: Method 1

Hi all,

This first tut is taken from How to draw. It's pretty simple: you draw a circle, then add 5 petals and shade. This is it. 5 minutes on the clock.
The coolest thing about a pansy is that you don't have to draw your lines straight; they can definitely be a little bit curvy.

This is the result. (refs 1, 2, 3)

The one thing I've learned from this lesson is that when shading a big area you should shade simultaneously in several areas. I did this pansy on a A4 sheet so it was a pretty large area to shade. I divided the petals into several areas each so I don't loose a shading direction. and that made my life so much easier!!!

But it appears that drawing pansies with pencils is pretty boring, not like Roses or Callas. And as much as I like pansies - and I really do - it might be pretty difficult for me to draw them for a whole month. I'll have to think of something to deal with this task easily.

October 01, 2012

October: Month of a Pansy

Hello!!!

It's October and it's time to move on to another flower!!! This time - a Pansy!!!
(source)

I see them mostly in winter and they tend to survive Israeli rain and heavy sun. And apparently, they are real survivors, since they can live in snow too. Which is nice, because any winter could use some color.

Pansy is a cultivated hybrid of several Violets and the difference is all in the petals. They both have 5 petals but in Pansy four grow up and one down and in Violet - three grow up and two down.

Pansy comes in many colors, single and double. They come in purple, yellow, white and black. According to Wikipedia, no flower comes as black as Pansy.

Mostly cultivated in Britain, by the year 1833 there were more than 400 types of pansies available.

Its name means "thought" and therefore in many cases it was chosen as a symbol of freethinking. It was mentioned in poetry and fine arts and apparently, it has no smell. How "nice" is that?

Have a great day,
D.

September 30, 2012

How to draw an Orchid: Links and conclusions

Hi all.

September is over and it's time to conclude.

This month I found 4 worthy tutorials that explain how to draw an Orchid. Orchids have many many different forms but the idea is the same: a center and six petals. Usually, the bottom one differs a lot from the rest of them.

Here they are - the September tuts.

  1. Method 1 - taken from How to draw cartoons online!.
  2. Method 2 - taken from Dragoart, one of my favorites.
  3. Method 3 - another one from Dragoart, I told you it's one of my favorites.
  4. Method 4 - taken from TLC How stuff work. Plenty of useful tutorials there.
This was a nice experience. I love orchids. In fact, there is an orchid garden nearby, called Utopia. If you ever come to Israel, do visit there. It's absolutely stunning.

Have a great day,
D.


September 28, 2012

Yom Kippur

Hi everyone.

It's yom kippur outside.

One doesn't say happy holidays or Yom Kippur sameah on this day. One asks for forgiveness. From friends and family, from neighbors and service people. From God. One gives his/hers best behavior so one's name - and life - would be a part of the next years' Book of Life. It is Filled in Rosh ha Shana and signed and sealed on Yom Kippur - the Atonement day. The Judgment day. That's what a tradition says (and a Wikipedia).

Yom kippur had passed several days ago. And since I'm being constantly late with my post for the past several months I ask for your forgiveness. I'll do my best to improve.

Have a great day,
D.


September 24, 2012

How to draw an Orchid flower - method 4

Hi hi, how are you all?

We are moving on to Method 4 out of the How to draw an Orchid flower series.

This one is taken from TLC How stuff works. As always, they give you a traditional style drawing, I would even say - classic. Which is great because, like someone very wise said, "you most master the rules before you break them".
And that's what we're trying to do here - to master the item so we can alter it in the future.

Going through the tut, I've realized that so far this is the most difficult I've seen since I've started the Flower Project in January. It has 5 steps and Step 1 throws you straight in the water - no structural building, no flower division but all the basic forms to be in place from the very beginning.

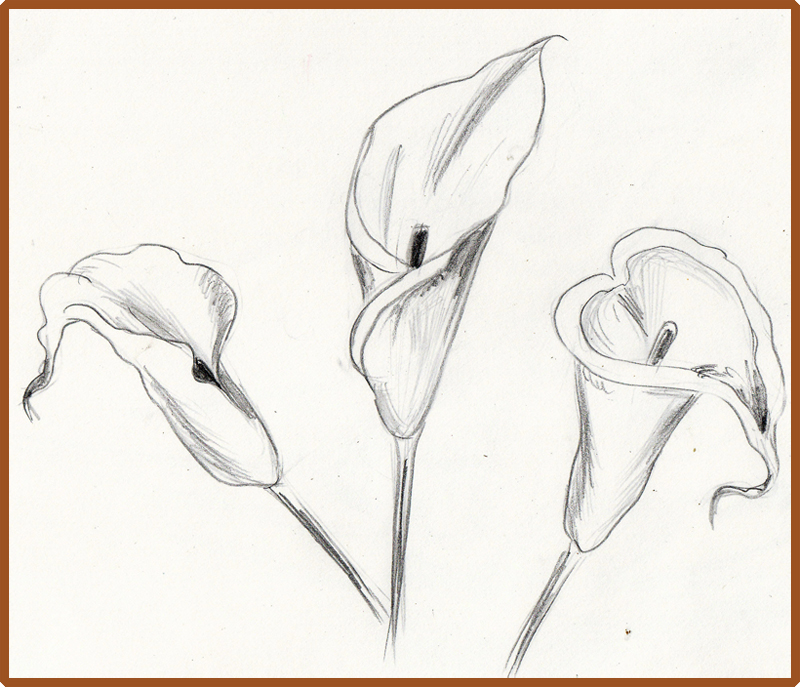
Since it was a complicated sketch from step 1 I had to decide where to begin. So I started from the very center - the small ellipse in the center. Then I did the upper long petal and the double bottom that looks like 8. Then I did the two on the left and the two on the right. I finished with the flower stem and the leaves. Only after I placed all the elements on their place I could make the forms look more like they're in the original sketch.

This is mine base don this tutorial.

And here are my referenced sketches.

To tell you the truth I didn't exactly follow the tutorial sketching these, but I did follow the principle. I started to outline the general form, placing flower parts where they belonged and then - the rest of it: details, shading, etc.

I hope you found this tutorial and post useful.

Have a great day,
D.

P.S. This is the longest post I've written since I started this blog.

September 20, 2012

Happy Rosh HaShana


Happy Rosh haShana, everyone!!


For me it was a special one since it was the very first time that I spent Rosh haShana outside and without my family. Don't be alarmed, everything is fine. It's just that we took a vacation with our friends and kids to Golan Heights and spend the holidays there. And what a holiday was that!!!

We were waking up to a birds singing and bees buzzing; a friendly local dog visiting us every single day. Also we had a very rare chance to watch a sky filled with stars - since there was almost no city illumination in the area.

On the Rosh haShana eve we had a semi traditional meal with pomegranates, apples dipped in honey and a delicious honey cake with almonds on top- yes, I know, I should've make some pictures.

And of course, we walked around the area, visiting a local winery and a watching really small waterfall.

But mostly, we just rested enjoying our kids and being lazy at times.


Although, I must admit, I really missed the hustle of preparing a grand meal on a Rosh HaShana eve... But no worries, I'll compensate on Sukkot, which is just two weeks away...

Wishing you a great holiday season,
Dalia

September 15, 2012

How to draw an Orchid flower - method 3

Hi hi!!

Let's go through the third method of how to draw an Orchid. The method is also taken form DragoArt.com , and it's quite simple. You draw a circle first, than an eight-like shape right on it. Then you add half an ellipse to the upper part, some pirate -shaped mustache to the bottom part and then the rest of the three bottom petals.


This is the "by the book" method.


These are the "by the ref" sketches:


It took me a while to complete them, but not because it was difficult but for some other reason which is not detected yet.
This is the exact reason that made me do so little sketches.


I even started to sketch a branch of flowers but left it in the middle, because it just didn't flow right.


I mean, don't get me wrong, I loved this method, it's wonderful.

But it just didn't feel like drawing at that point so I left it as is. But for the sake of the post I've decided to include it too so you don't say I'm not drawing enough.

I don't know, maybe it's some kind of bad mood or a feeling f the end of the year. Or maybe I just got sick of this "12 flowers" project, I don't know...


Anyway, this is it for now...

I'll see you soon,
D.

September 11, 2012

Admiring flowers

Hi all,

I've been drawing flowers for some time now - 8 months, to be exact - and while searching for some references, I keep on wondering how is it possible to develop so much beauty in this world!
I mean come on, take a look at this White Orchid, isn't it stunning? Or this White Tulip - an absolute perfection!!!
I know, I know, it's just a frame, you'd say, a talented photographer... Well, I'll have to agree and disagree...

One day I got a perfect White tulips bouquet and must I telL you - it was stunning!!! Huge corolla, beautiful gentle petals - I couldn't get enough of it... The three you see here are just the three out of it. I fell in love since.


What can I say? I love flowers....

Have a great day,
D.

September 10, 2012

How to draw an Orchid flower - method 2

Hello!!

This is a second post out of How to draw an Orchid series. This time I used - again - a DragoArt tut. I love this site since it has so many useful tutorials in it! I don't think there was a month that I didn't use something from it. And this month is not an exception.

The method is simple: draw two uneven ovals, one overlaying the other. Inside each draw a circle. Then you work on a center and then you add petals. Sounds simple? Not as it sounds.
As I said previously, I love DragonArt tuts but this method made me love the orchid a bit less... Following the tut and drawing the center of the orchid made me constantly think of octopus tentacles... And I find octopus a fascinating and beautiful creature.


Anyway, this is the "by the tut" sketch. It's so weird - it usually takes me minutes to complete the by the tut sketch, but when it comes to other sketches - sometimes it can take days to do one!!! So frustrating!!!

And here they are, of course, the "by the ref" sketches.


As you can see, I drew branches again and not only a single flower. It took me some time to do all of them, sometimes too long which was a bit annoying but I managed to complete it.

It looks ok, I think.


And here's what I've learened during these sessions:
Tip of the post: When using several reference images for the same item, always save your links for not wasting time later on. I used to look one reference at a time, searching same web pages over and over again. Now I save the links for those images I find suitable for the sake of the tutorial. Saves me SOOOO much time!!!

Tip of the post: always use at least three pencils - at least at the beginning of your training. A hard one - 2H or lower for the first sketch. It will give you very bright and erasable lines. An HB - for outlining and correcting the existing sketch. A soft one - 2B or higher for shading.   

September 07, 2012

Rosh ha Shana is on it's way!!!

Hi all!!!

The summer is over and it's September again. Yellowish leaves, colder (oh, I wish) weather, shorter days and longer nights and many many holidays to celebrate.


The first one that comes my way is Rosha haShana, a Jewish New year. 
Since Judaism follows the Lunisolar calendar (approximately 28 days + additional month for balance, if needed), for those who follow the Gregorian calendar the dates of the holidays change every single year. This year the celebrations begins Sept. 16th while last year it began Sept. 28th. Sometimes it is in October but never in August or November.

As any New year it is all about new beginnings and wishings for a better year. And, weather you are religious or not, there's always a family feast in the end of the day. Well, like in any major Jewish holiday :)

There's a Gefilte Fish or Hraime with its head to symbolize the head/the beginning of the year; Apples dipped in honey for a sweet year; Pomegranate seeds for fruitful year, Dates - no idea for what, it's just yummy :) And, of course, there is an infamous Leikeh, a Honey cake for dessert. (and I must admit I'm drooling for that cake right now...). And like every year, we leave the table with filled bellies wishing we hadn't eaten that much.

Anyway, this all will happen in a week and in the meantime, I will wish you a great week and happy upcoming holiday season!

Dalia


September 05, 2012

How to draw an Orchid flower - method 1

Hello!!!

This is method one of How to draw an Orchid tutorial.
I chose the easiest - so it seems, at least - tutorial I found online. It is taken from How to draw cartoon online.
It says that you draw a structure of six lines coming from a center and then you just draw. When the author explains about the flower he says that orchid is basically a two layered flower when each layer has 3petals. So after you're done with structuring the 6 line skeleton you can begin with the flower itself.


This is my sketch. It didn't take me long since these are outlines only. You could expect it to be very schematic, since the lines are so straight and forward.


And these are the other sketches. After three single flowers I've decided to go wild and do some full orchid branches.
Although choosing simple ones I loved working on these branches since it had some slight twist on each flower, bud and leaf.

Not my best work, I must admit, although the upper left is ok.


This month I've decided to enter permanently the Tip of the post part which will be concentrated every month in the concluding post and possibly in the end of the year in one big Tip of the Year post.
So today's Tip of the post is as follows: Go over the line with your eyes first before drawing it. Try to remember its curves. They are the ones that make everything so special and differ one item from another.

I hope you found this post and tut useful.

Have a great day,
Dalia.

September 01, 2012

September: Month of an Orchid

Hi all,

First of let me say that I absolutely adore Orchids... For me it is one of the most elegant plants of all.
I remember walking from school one day seeing a woman sitting behind a desk with several Orchids in pots. All types, sizes and colors. When I came closer I was shocked to realize that all these flowers were a fake!!! They were made out of some kind of clay, colored so realistically that it took me some time to believe they weren't real. These clay flowers where made with such care for every detail it was really hard to tell the difference. Of course, the price was pretty high (as it should have been).

But besides admiring this flower I know absolutely nothing about it. So I guess now it's time to learn.

According to Wikipedia Orchid is a "diverse and widespread family of flowering plants with colorful an fragrant blooms".
It is the widest plant family with more than 20K species accepted up til now.
Wikipedia also says that the name of the flower comes from the Greek word for testicles, because of the shape of the Orchids root. And, just like with a last month's Narcissus, there is a myth behind a name.

I must say that I have no preferable Orchid. But I absolutely admire its beauty and its shape.
I tried to groom one once but failed disastrously. I guess Orchids are just not for everyone.

I hope you'll enjoy this month's tutorials.

Have a great day,
Dalia

P.S. Apparently, there's a whole website dedicated to the flowers of a Greek mythology...

August 31, 2012

Narcissus/Daffodil: Links and conclusions

Hi all,

It's Time to conclude again.
Usually when I start a new month and finish collecting tutorial links, I usually sort these links from easiest to the most difficult. This time I couldn't since they all seemed pretty simple.
So, for your consideration, here's the list:

1. Method 1 - Taken from DragonArt. Nice and simple.
2. Method 2 - is taken from Drawing How to draw, I love it, there are some great sketches in it.
3. Method 3 - is taken from TLC how to, stunning sketches, as always.
4. Method 4 - well, I skipped it due to a PC failier, which, I believe you remember me posting about. (published Sept 2013)
5. Method 5 - same as Method 4. But I do promise to make an update on these and to publish it soon. (Added Dec 2013 under the original date).
6. Method 6 - taken from Simply one stroke, a blog of a One stroke method artist, Pat Goh.

This is an additional DragonArt method I found but didn't use - but you are welcome to check it.

And this is an Echo and Narcissus story, if you didn't get to read it in my Opening post for this month.

Have a great day,
Dalia

P.S. when I searched for an online images of these flowers I realized that searching for Daffodils gave me a better image list than searching for Narcissus. I wonder...

August 29, 2012

How to draw a Narcissus/Daffodil - Method 6

Hi all!!!

It's Tuesday and it's time for another method.
This one is taken from Simply One Stroke blog - and you should check it out, Pat, the owner, has some gorgeous art works.

It's a video tutorial and it's lovely. Easy to follow, thanks Pat!

This is my "by the tut" sketch.


I didn't add any shading but I did this small bouquet Pat added on the side, really cute.


And these are the sketches by references.


I must say I'm pretty happy with these. I took me some time to sketch the one on the left - the five flowers, but I really enjoyed doing it.
Also I really love the one on the upper right corner, I think it's pretty good.


Well, I guess this is the last one for this month.
In September we'll be working on Orchids, and all the upcoming holidays.

See you soon and have a great day,
Dalia

August 26, 2012

PC is live again!!!

Hi yall!!!

My PC is live again!!!

Apparantely the Screen card collapsed but a quick check shoed that it has some kind of cream-becoming-plastic that got dried (or something) and it kind of disconnected the card from everything else .... or something...

So thanks to the team of TMS my PC is working, hopefully for long again.

I'm back, baby!!!

August 25, 2012

How to draw a Narcissus/Daffodil - Method 5

Hello,

We move on to the Fifth How to draw a daffodil/Narcissus tutorial. This is another DragoArt tut, a wonderful one, as usual. Simple, user friendly, easy to do tut. 

I finished it pretty fast. It is indeed as easy as it seems.

The references are from the web, as always. I captured the form, didn't look for a perfect resemblance or for a perfect shade. All I cared about was to create the form of the flower itself.

Hope you found this method useful.

Have a great day,
Dalia

August 20, 2012

How to draw a Narcissus/Daffodil - Method 4

Hello.

This is a method 4 of a Daffodil/Narcissus drawing. This is a video tutorial and as much as I don't like them I have to use them since sometimes they are really really good and useful.

So it's like ellipse, upside down cap, ellipse.

That's the "by the tut" sketch.


And these are the by the web ref sketches.


These four didn't take me too long to complete, all fast ones, bad shading, but that was not the task here. It seems it was a very good and simple tut that could be applied to many other flowers.

One thing I learned from this tut, that all you need is two circles and a cap to draw a daffodil.

Have a great day,
D.


August 17, 2012

My PC collapsed!!!!

Hi all,

Due to a PC collapse, some of my posts will be published a bit later.

See you soon,
D.

August 16, 2012

How to draw a Narcissus/Daffodil - Method 3

Hello!!!

Welcome to Method 3 of How to draw a Narcissus/Daffodil month.
This time I will be using a TLC how to method. What drawn me to this method is the lightness of the first sketch. The lines and the circles the artist uses here are almost weightless and this is something I am willing to achieve too - make my work lighter than it is now.

There are five steps and, as in most of tutorials, one starts with lines a

This is my "by the tut" sketch.


Not bad, I'd say.
Light, simple, basic.
It was pretty easy to complete.


And these are the other sketches.


As you know, I usually use references I find online. While browsing the web I saw a photo with three daffodils and I really wanted to sketch them. Well, see here I really struggled. I have no idea how many times did I erase and started this sketch all over again! But I loved it so much I had to continue!!! I'm not saying that this one is great, but for sure it's better than it could be.

Practice brings to perfection, is that what they say?
And I try to practice as much as I can.


I hope you found this tutorial useful.

Have a great day!

August 15, 2012

"Sketching is for ideas as Drafts is for writing" - Idan Gazit presentation

Hi all,

Yesterday I attended a lecture at Meetup Israel, and later on I found a presentation by the same lecturer, Idan Gazit, about the ipmportance of sketching.
You have to register to see it but it's bt a big deal.

Here it is - I thought I might share.

Have a great day,
D.

August 12, 2012

How to draw a Narcissus/Daffodil - Method 2

Hi hi!

This is Part 2 of How to draw a Narcissus/Daffodil flower.

The method was taken from Drawing How to draw web site. When I saw it at first I was really impressed with the drawing its author made and I thought to myself "hmmmmm... that must be difficult..." And boy was I surprised!! The tutorial is simple, organic and very easy to follow...
You draw a line, two circles with a U shape and finish with petals. Some shading comes in the end.


This is my "by the tut" sketch. And I honestly think it came out really nicely. Very accurate.


And these are the other sketches.


Some of them I love more than others, for example the one on the bottom right corner.
And I hate the one opposite to it, the one on the upper left corner. I could, of course, leave it out of this post, but hey, it's a learning process. I should include my flops too, don't you think?


Anyway, here they are and I hope you found this tutorial useful.

Have a great day,
Dalia

August 07, 2012

How to draw a Narcissus/Daffodil - Method 1

Hi hi,

For the first method i used a tutorial created by DragoArt. A simple method that describes how to draw a narcissus/daffodil.
You begin with drawing a draw a center of a flower and half an ellipse connected to it. After that you add six petals. That simple.


This is a "by the tut" sketch. I was really surprised how simple it was. It took me several minutes to complete.


These are the other sketches. Since I shaded it a bit, it took me around half an hour to complete each of them. I had a great time doing this session: simple, fast, not many petals.


My personal favorite is the bottom on the right, looks most realistic to me.


I hope you found this method useful.

Have a great day and see you soon.

D.

August 03, 2012

Resetting goals for the second half of the year

Hi all!!!

The first half of this year is over and it's time to go over the goals I've set to myself in the beginning of the year.
So this is the list. 10 of its items are the original ones from the beginning of the year. The last three were added as the year went by (and, for sure, I will continue to add some more).

Let's see what I have achieved during the last six months:
  1. Sketch, sketch, sketch!!! As much as possible!!! - I do!!!! Several hours a day, several days a week! (see no.11)
  2. Learn how to draw all Chinese calendar characters to get ready for the next year in advance.
  3. Same for the Zodiacs, of course :).
  4. Do a 5, 10, 15 minutes exercise once a week. It shouldn't be hard to dedicate half an hour of my time to such a development. - I must get back to this exercise...
  5. Draw 12 flowers during this year, but do it in such a way that it will become a second nature. I mean, I love daises, but come on, I must move on.  - I'm actually half way through :)
  6. Work on Portraits and Human figure. - Yeah, right... Hopefully next year...
  7. Get ahead of myself and be ready for the holidays at least 2 week before it comes. Which means, start preparing for it at least 2 months in advance. - I'm working on it... It's really time to get ready for Fall holidays...
  8. Learn about Illustrator Brushes and Symbols - thanks for the reminder, Ryan.
  9. Do DrawSpace lessons more often. 
  10. Become a regular on Illustration Friday. I've made one or two illustrations in the past, but that doesn't really count.
  11. Draw at least 1 hour a day - every day! And keep it documented in my Journal. (added on March, 2012). - I draw and I document - at least try to... (I will make a days count in the end of the year)
  12. Learn how to shade properly (Added on March, 2012).
  13. Learn to draw water and water drops (Added July 28th, 2012).
  14. Continue working on my Zazzle shop - add at least 500 more items (Added July 31st.)
  15. Try to blog twice a week (Added July 31st)
  16. Add to Shutter stock gallery at least 30 items til the end of the year.  (Added July 31st.)
  17. Continue developing SEO skills.  (Added July 31st)
  18. I've started learning HTML again - I might build a website soon.  (Added July 31st.)
* Does it feel like I'm spreading again? It does to me... 

Well, I can't say that I'm really happy with the meantime result. 
3 in progress - items 1, 5 and 11. 2 in thoughts - items 4 and 7. The rest - 2, 3, 6, 8-10, 12-13 are untouched. 14-18 were taken from my 2011: The conclusion post so they don't really count since they were only added today. I hope to get to some of them during the second half of the year. Some - I believe will be delayed to the next year. 

And what about you? Have you made any plans this year and checked them already? 
Do share.

Have a great day, 
D.

P.S. I had a baby too :)

August 01, 2012

August: Month of a Narcissus/ a Daffodil

Hello all!!!

It's August and I declare it a month of a Narcissus!!!
And what can be said about the Narcissus that hasn't been said already?

A well-known myth tells us of the Narcissus, a Greek hunter who fell in love with his own reflection. That love brought to his death by drowning and a beautiful flower grew on the river's shore.

A Narcissus, aka Daffodil, grows during winter and spring, both in a wild and in one's garden. Some of it is large with yellow petals and a darker yellow crown. Some of it is tiny white or yellow ones with yellow or white crowns. And it grows almost everywhere!!!

I don't know why I like narcissus. It's not really a flower I would pick for myself or a friend but I would definitely plant it in my garden, if I had one. There's something very fragile about a Narcissus, modest and almost submissive. And like a Narcusses the Greek hunter, it looks down ready to discover its own reflection.

Let's hope that my future sketches will reflect the references.

Good luck to us all!!!
D.

July 31, 2012

Water Lily: Links and conclusions

Hi all!

It's the end of the month and, as usual, it's time for a conclusive post.

These are the tutorials I used during this month:
1. Method 1 - taken from DrawingFactory, simple, with a little bit of shading.
2. Method 2 - taken from DragonArt.
3. Method 3 - Taken from DrawingNow, almost a video tutorial, but not.
4. Method 4 - taken from FinalProdigy. A very nice tutorial, but I must say that you guys have almost missed since at some point Final Prodigy wasn't available for its clients and I was so close not to publish this method. Thank god I published the tut several days after it was scheduled.

I didn't use this one - Water Lily tutorial that I found on YouTube. It's really nice and really really simple... I guess I could have used it as a first one... I loved the background song, though...

Throughout this month one though kept me really busy: is there really a difference between a Water Lily and a Lotus. Some articles said it's the same. Some - they are different. And even Wikipedia clearly said that these are from two different families I was still confused.
But then I found this article, Is Lotus different from Water Lily, explains it all very, very clearly.
I love it when I find answers to my questions, don't you?

Have a great day.


July 28, 2012

How to draw a Water Lily - Method 4

Hi all,

This is Method 4 of How to draw a Water lily Month.
This tutorial here brings a completely different angle to drawing water lilies: it starts from the center, aka, its stamens.
It's taken from FinalProdigy, and if you browse through the site you will find many great tuts for you to learn from. Thanks you, FinalProdigy, for sharing these.

Anyway, this is "by the tut" sketch.


And these are the "By the web image" sketches...
I did less then I was supposed to do, but it takes me pretty long time to do them. Also the shading is still a mystery and a challenge to me but I'm doing the best I can at this moment (I know, I know, I should stop whining and start working).

So let's work!!!

I'll see you in a few days with a new method.

Have a great week,
D.


July 20, 2012

How to draw a Water Lily - Method 3

Ha all,

It's time to method 3 of How to draw a Water lily.

This tutorial is taken from DrawingNow and based on a Crescent and an Oval.
A big part of this tutorial is dedicated to shading, wonderfully suitable for color shading.

So I did the sketch but ignored the shading and this is the result:


Too simple, too plane, but I did try to compensate it with other sketches that you can see below.


These were based on the web reference, as always. It took me really long to make each sketch; I really worked hard on that shading.
I tried to deal with sketching water again; nothing much came out of it, just plain dark spaces... But I guess it's a beginning...


This tut was very fun for me because I like the way DrawingNow tuts are built. They are on the edge of being a video tutorial, but somehow it's not really it, so it makes it bearable.


I hope you enjoyed this tutorial as much as I have.

Be it a great week for you,
D.

July 19, 2012

Holiday illustrations - here I come!!!


It's summer time now and major holidays are far away in the autumn season!! But everybody knows that any seasonal business works best when everything is ready 5-6 months in advance. 

Since I'm always late with seasonal illustrations I've decided to start working on them these very days. I know, I know, some might say that I am late again, but the intention is good and I believe that I am not hopeless.

So besides drawing flowers I should start working on some new illustrations. The main thing is to doodle now. Doodle all the time. The ideas will come during the process. 

I'm thrilled!!

All I have to do now is just - do it!

Best regards, 
D. 

P.S. Have you noticed that there's no llustration this time?

July 13, 2012

How to draw a Water Lily - Method 2

Hi all,

Moving on to Method 2.
This time I will be using a tutorial from DragoArt website, wich I use a lot, as you know.

As in the previous method this sketch is based in the outer and the inner circles.
The difference between these two is that here the author uses planes and not layers. The front plane of the flower is the one with petals that are the closest to the viewer.
Second plane - is the center of the flower.
Third plane - the farthest petals.

This is "by the tut" sketch.


And these are the additional sketches.


To tell yo the truth - I have nothing more to say on the matter.

I hope you found this method useful.

Have a great day,
D.

July 06, 2012

How to draw a Water Lily - Method 1

Hi all!!!

Let's begin.

For the first method I chose a tutorial from Drawing Factory.

The author breaks the flower in two circles - the inner for center and outer for petals. The petals go all around the center - layer by layer.
Circles around are for the leaves floating around the Water Lily on the pond's surface.

I can't say that it was very difficult. The author made this tutorial really easy to follow. But really was like drawing a Rose for the first time, since I almost got lost in the Lilly's petals when I did this one.

Another challenge was to draw water which was the very first time for me. I did water once before in oil actually, but not in pencil sketch.


Anyway, these are other four sketches. Had lots of fun, although the water thing didn't really work very well... as well as shadows...


I hope you found this method as useful as I did.
Feel free to leave a comment.

Have a great day,
D.

July 03, 2012

Drawing and writing - To scedule or not to scedule?

I first started this blog in 2009.

The original idea was to develop my drawing skills and keep some kind of a diary to keep myself motivated. I needed a place to share my sketches and illustrations, the work in progress and finished projects.


My first post was published on January the 31st, 2009. And it was all about Discipline (hmmmm....)
And that was the only post on that month. Well, there are no more than 31 days in January, so...

After that I've published 6 posts in February and 1 in March.
In total I've published 16 posts in 2010 and 22 in 2011.

When 2011 was at its end I began - as many of you - to get ready for 2012. I've realized that if I really wanted to become a better illustrator I needed a routine. A proper schedule that I would work towards. Something like a weekly deadline. I wanted to post my results at least once a week - so I started to schedule my posts. To make it even harsher, I made a new commitment recently - to draw for at least an hour every single day (and check it in my daily planner)! At least 4 times a day. Of course, not only for the purpose of this blog but for other purposes as well. 


As you know my main drawing theme this year is a flower. 12 flowers until the end of the year. So there are at least 4 drawing methods for each flower. There are an opening and a concluding post. And from time to time some posts in between - like this one. 


Its July now and up til now I've published more than 50 posts.
It gets easier to draw from day to day.

I can say that I'm pretty proud of myself - I keep my promises.

I wish you a great day and a fun summer holiday.

Best regards,
D.

July 01, 2012

July: Month of a Water Lily

Hi all.

For the past two months I've been working on Lilies: Garden Lilies in May and Calla lilies in June.
This month I will be working on Water lilies. Why, you ask? Because according to Wikipedia, it is a birth flower of July.

So what can we learn about them?

According to Wikipedia, there are 70 species of water lilies and they grow in temperate and tropical climates. They grow in rivers, pools and ponds with roots and stems under and flowers and leaves above the water surface.
They come in various shapes, colors and sizes and the largest of them, Victoria Amazonica, grows in South America.

Water lilies were immortalized on Claude Monet paintings.

But here's the thing. For some time now I've been wondering if there's a difference between a Water lily and a Lotus. For some reason I never bothered to check it.
Recently I began asking that question again and here's why. First - I learn to draw lilies now. Second - my sister opened a jewelry store and named it Silver Lotus. Obviously, the question came back to me and finally I've decided to find out - is there really a difference between the two or is it the same flower?

But I'll keep it for the August opening post.

Have a great day,
D.

June 30, 2012

Calla Lily: 3 methods (+1) in one month

So let's conclude.

Two almost similar written tutorials and one is a video.
1. Method 1 - taken from DrawingNow.
2. Method 2 - taken from How to draw cartoons online.
3. Method 3 - taken from YouTube.

There is one more by DragonArt which I didn't use but its there and I feel I can't ignore it completely.

And what have I learned during this month?
1. When drawing from an image reference (if it's an online one) always save a link or an image. It is not always possible to complete a sketch in one session, so it is very useful when you can get back to the original one instead of starting it all over again (happened to me several times before).
2. I started sketching with HB and 3H pencils as planned and the outcome - obviously - much less messier.
3. In general, callas have a very simple structure - its lines are flowing and all you have to do is sketch the line, find and place the bud's curves.
4. Started erasing outside lines only. Since I'm sketching now with harder pencils at the beginning, there's no reason to erase the inside lines. I'm shading everything anyway, right?

I hope it was a productive month for you.
Next stop - a Water lily!

See you soon,
D.

P.S. Watched Silk recently. Beautiful, slow, flowing movie. And White and Calla lilieas are a great motif of life and death in it.
also, for your entertainment, do watch this Calla Lilly Centerpiece video tutorial. It's stunning.

June 28, 2012

Drawing Calla lilies - Bouquets

Hello!!!

Since I found no more tutorials for drawing Callas, I've decided to use online resources to draw some Calla bouquets.
I've chosen some nice an simple ones for practice. Here they are.


Next week I will be drawing callas from life.

This is what this post was supposed to be saying.

But as you see - the text is erased.
And the reason is that I failed big time. I could draw a single bouquet this time... I tried several of those I found online, but I kept on erasing every line I made. You could think that I didn't do anything, because, logically, I was supposed to scan even those I did badly, even to just justify this post.

But I got so frustrated that I erased sketches and tore papers. I've been working on these a lot, but there was nothing. Only yesterday I've realized that I should have kept and show everything.

I hope next time I will be wiser and more cold spirited and not let my emotions to get over me like that.

Because even a failure is a step to success.

Have a great weekend,
D.

June 19, 2012

How to draw a Calla Lily: Method 3

Hello :)

This time I'm gonna use a Video tutorial. And since you all know that I don't really like them, the obvious question would be - why do that? Well because there are not enough written tutorials for this flower. And as much as I don't like videos I really had no choice on this one. You could tell that the situation is really bad since I had to use similar tuts for Method 1 and Method 2.

But no matter, as long as I learn something new, that's what important. And this method is indeed different.

So this is "by the tut" sketch.


And these are reference made.


I really enjoy drawing Callas - they are very elegant and really simple to draw. No wonder they are being used for weddings and funerals!


Did you find this method useful? I know I did!

Have a great day,
D.